Showing posts with label Collage. Show all posts

Wednesday, May 10, 2023

Fairies in the Flowers: A Peek-a-Boo Project

I am missing the old homestead this time of year, as another Mother’s Day approaches without my sweet momma being with us. Her flower gardens were magical, we had a lilac hedge between the lower lawn and the newly plowed garden. A pathway between the row of lilacs, keep the tulips and the lupins in the designated area. Ancient Old Fashioned yellow roses next to these, with three lavender colored petals Ohio Spiderworts at their base, a remembrance of my grandparents time spent in that state. A narrow bed of Siberian  Irises between, the front yard, driveway and garden had a clump of orange poppies and painted tinted daisies. Gladiolus were planted in rows of the bountiful garden with its bread and butter corn, zucaanni and yellow squash, red beets, string bean, potatoes, kohlrabi and sometimes lama beans and peas. The lower end of the garden had a row of pink, red, and white peonies we were told that ants were needed to help them bloom as their bud were so compacted. The last flower bed at this side of the garden was one of my favorites, as it held the Bearded Iris Collection. 

There is another flower garden that was hidden in the side yard, beyond the black walnut trees, and hickory nut tree, along the old road in the shadow of the woodshed. This was the wildflower garden, perhaps the most magical of all, almost as if fairies could be found frolicking there. These are the inspirations for this artwork.


Supplies:  GSLC Arch Top Houe Silhouettes, Antiquarian Sticker Book: Imaginarium, Printed Woodgrain, Pencil, UHU GlueStick, Sanding Block, Green Markers, DecoArt Matte Gel Medium, Paintbrush, 49 Market Rub Ons, Fern Vine Paper Punch, Old Calendar Pictures, Ranger Glossy Accents Dimensional Medium, Small Plastic Palette Knife, Blending Tool, Brown Archival Inks


  1. Gather Supplies.
  2. Print Wood Grain on Ink Jet Printer.
  3. Spritz with Water Allowing to Patina the Print.
  4. Once Fully Dry Trace using  GSLC Arch Top House Silhouettes  With Pencil  and Cut Out.
  5. Use a UHU GlueStick to Apply Cut Outs to GSLC Arch Top House Silhouettes.
  6. Once Fully Dry Use a Sanding Block to Tidy Up the Edges.
  7. Darken the Edges of GSLC Arch Top House Silhouettes with Green Markers.
  8. Seal it all in with DecoArt Matte Gel Medium and a Paintbrush.
  9. Collect Images from Antiquarian Sticker Book: Imaginarium. I Found Lovely Flower Fairies and Glued Them as Focal Points in Center of GSLC Arch Top House Silhouettes.
  10. Next Add 49 Market Rub Ons of Stamps , Butterflies and Flowers, Creating a Collage Effect.
  11. Use Fern Vine Paper Punch and Old Calendar Pictures to Add to the Collages.
  12. Once Layered and Satisfied With The Content, use a Ranger Glossy Accents Dimensional Medium and a Small Plastic Palette Knife to Unify the Completed Collages.
  13. Darken the Edges with a Blending Tool and Brown Archival Inks.

Final Thoughts

I was fascinated by the Cottingley Fairies Story. Two young cousins, in 1917 convinced their neighbors and eventually the larger world that there were fairies at the bottom of their gardens. Cottingley Beck still flows in English Countryside. They eventually photographed them and presented them to their family and to the Theosophical Society. Eve. Decade laters it would eventually confirmed they were fakes, cut-out figures, copied from “Princess Mary’s Gift Book” published in 1914. Finally in 1983 one of the young girls now much older, confessed to the hoax.

My momma’s wildflower garden was a collection of ones we gathered in the hollows and woodlands near our family homestead. The mosses almost glow with their intense greenery. It is too early for the mysterious India Pipes to appear with their milky translucent stems and solitary nodding flower.  Soon the flowerbed will carpeted with the dainty purple violets, the strange jack-in-the-pulpits, the brown-mottled tiger lilies, the elusive pink lady slippers, the comical Dutchman breeches, the attractive dainty white and pink striped spring beauties, called "piss in the beds" by his normally regal mother. There will be odd red and white trilliums, named "Nose Bleeds" by his inquisitive mother. Spring is truly the time when the world wakes up with an ever-changing landscape.  


Wednesday, July 11, 2018

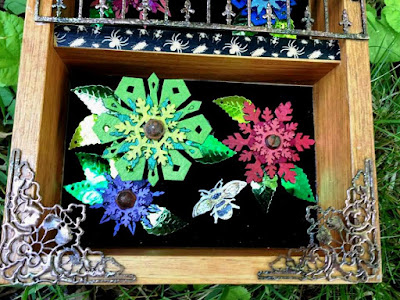
Gothic Garden-Peek-A-Boo Project

I hate seeing supplies going to waste and I enjoy a bit of a design challenge. That is the inspiration for my Gothic Garden Project. 

Supplies: Gypsy Soul Laser Cuts-Winter Shape Set, Gypsy Soul Laser Cuts-Snowflake Shape Set, Gypsy Soul Laser Cuts-Dragonflies Fancy, Gypsy Soul Laser Cuts-Creepy Corners 1, Gypsy Soul Laser Cuts-Gothic Border 6 Inch, Gypsy Soul Laser Cuts-Art Deco Border & Corners, 2 Sections Bamboo Desk Organizer,  Black Velvet Paper, Weldbond, Bonefolder, Acrylic Paint-Shades of Blue, Red, Green, and Purple, Small Paintbrush, bag of BBs or kitty litter, Versa Mark, Ice Resin Enamels Tarnished  Bronze and Torched Copper, Judi Kins Embossing Powders- Opaque White and Perfect Peacock, Rangers Black Sparkle Embossing Powder, Heating Tool, Green Leaf Sequins, Mini Hardware Finnabair Mechanicals Metal Embellishments, Glue Stick-I prefer UHU, Washi Tapes, Nails with Large Flatheads, Hammer, Dura Clear Matte Varnish, DecoArt Dark Gray Fluid Acrylics,
1.   Separate all snowflake shapes from both Gypsy Soul Laser Cuts Winter Shape Set and Snowflake Shape Set.
2.  Stack them into sets of three these will become your flowers.
3.  Measure black velvet paper carefully to line bottom sections of Bamboo Desk Organizer. This will become our "frame"
4.  Spend some time going through your acrylic paints and using spare shapes from GSLC Winter Shape Set to make your color scheme.
5.  After about an hour I settled on shades of blue, green, red, purple, and iridescent. They needed to look complimentary and pop once placed onto the black velvet background.
6.  Map out your garden using a piece of paper to assure best composition.
7.   Paint your snowflake flowers and place them  aside to dry completely.
8.  Paint two of the Fancy Dragonflies from Gypsy Soul Laser Cuts collection.
9.  Assemble your flower once they have dried and allowed to dry again completely and weighted down.
10.                Attach the two GSLC Fancy Dragonflies together only in the center body portion. Wing should remain free as we will use it as a design feature when assembling our garden.
11.                Distress the Mini  Hardware using Finnabair Mechanical Metal Embellishments and Rust Paste Set.
12.                Glue one to each center of the flowers using Weldbond.
13.                Add Green Sequin Leaves to each to further the flower illusion.
14.                Allow to dry completely and weighted down.
15.                Use Versa Mark and Ice Resin Enamels of Torched Copper and Tarnished Bronze to distress the Gypsy Soul Laser Cuts Art Deco Corners and Gothic Border-Cure with heating tool.
16.                Use Versa Mark and Judi Kin Opaque White and Perfect Peacock to emboss the spider web and Rangers Black Sparkle Embossing Power for the spider of Gypsy Soul Laser Cuts Creepy Corner Set-Cure with heating tool.
17.                Spider web looked too crisp so I toned it down with DecoArt Dark Gray Fluid Acrylics.
18.                Add a Washi Tape Border around the outside of Desk Organizer Frame using glue stick and bone folder to assure a perfect fit.
19.                Add a bit of the Washi Tape to the Center Border that separates the two sections.
20.                Reassemble your garden making not of where you will need to hammer your nails to giving variety of depth to your flowers.
21.                Carefully remove items from garden and use a hammer to place nails in correct locations.
22.                Use Weldbond to carefully glue all items into garden.
23.                Carefully flue GSLC Art Deco Corners and Gothic Border into their correct places.
24.                Allow to dry completely and weighted down.
25.                Add GLSC Spider Web to the top gluing into place with Weldbond allowing to dry completely and weighted down.
27.                Because the desk organizer has a lip on the back you can use this to hang your gothic garden or you can add a small saw and tooth picture hanger if you prefer addition stability.
Over the Rhine's Wildflower Bouquet is the perfect song for this project:
If I die in the winter send roses
In the spring, magnolias
If I’m called in the summer or in the fall
Best of all – bring me a wildflower bouquet
In the dirt and clay don’t lay me down
And stare at a cold lonely hole in the ground
When I go to my Maker in smoke and ash
It won’t be your grief I crave
Your tears will not be necessary
Build a blazing fire, drink something merry
When the sparks fly off into the wind
That will be me blowing away
Bury my ashes with the dogs I’ve loved
My faithful companions from God above
And ‘neath a sycamore we’ll grow strong
And the roots will bear us away
If my one true Love should join me there
Mother nature soon will be aware
That sycamore will thrum and sing
And we’ll have left it that way
So I don’t want you to feel sorry
God knows how I despise your pity
And I’ll no longer bear the weight of worry
Those angry robes all fall away


Wednesday, March 14, 2018

Peek-A-Boo Project-Queen of HeARTs

Today I said goodbye to my sweet orange Tabby named Ruby. She like the Queen of Hearts in Alice in Wonderland were both gingers and knew what they wanted. Ruby was short for Rhubarb because she was so sassy. This is my way of honoring her in a in a ruby inspired piece.
Supplies:  Reliquary - Arch Top from Gypsy Souls Laser Cuts, decorative paper, sand sponge, distress stains of your choosing,  permanent ink of your choosing, stamp to add details, ink blending tool, iced enamel medium, embossing enamel or powder, heat tool, Weldbond glue, clamps, small stiff bristle brush, focal point I used a polymer clay piece I created using molds and metal angel wings and mica powders,  Ziploc baggie of kitty litter, heavy gel medium,  assortment of metal and plastic embellishments, microbeads
1.  Take the Gypsy Souls Laser Cuts Reliquary Arch Top apart.

2.  Use back panel to trace a stencil on a piece of decorative paper you will use for back panel.
3.  Cut out decorative paper panel and adhere to back panel using Weldbond.
4.  Allow to dry fully.
5.  Use a sandpaper sponge to lightly distress the edges.
6. Apply Tim Holtz  Distress Stain Ripe Persimmon to the edges.
7.  Next use a stamp of your choosing to apply so interesting layers to your background. I used Wendy Vecchi Cactus Flower Archival Ink.
8.  Use a blending tool to add depth and interest to your background and to darken the edges.

9.  On top portion of Gypsy Souls Laser Cuts Reliquary Arch I added Iced Enamel Medium.
10.                Sprinkle with embossing enamel or powder. I used Susan Lenhart Kazmer Iced Enamels Garnet
11.                Cure with your heating tool.
12.                I added more age by apply some Susan Lenhart Kazmer Iced Enamels Torched Coppers in random areas.

13.                Cure with a heating tool.


14.   Glue the two pieces of the Gypsy Souls Laser Cuts Reliquary Arch together using Weldbond glue and clamps. I used a small stiff bristle brush to remove any Weldbond that squeezed through the frames.
15.                Gather central focal point. I used a polymer clay piece I made using molds and following instructions on package.


16.                Glue focal point using Weldbond I left room at the bottom to add smaller details.
17.                I use a bag of kitty litter to press securely on to background and allow to dry overnight.
18.                Assemble your project by building layers securing embellishments with heavy gel medium and a small stiff bristle brush.
 
19.                Before everything dries sprinkle with microbeads, I used copper and black.
20.                Allow to dry for 24 hours so heavy gel medium will cure clear.
 
This makes a great stand alone piece or 3-D Mother's Day gift.  I will be using it as panel for one of my Classic Combo Limited Edition Alice in Wonderland Treasure Books.