There is a
quote by Louie Schwartzberg that states. "Metamorphous has always been the
greatest symbol of change for poets and artists. Imagine that you could be a
caterpillar one moment and a butterfly the next." I feel myself growing as
an artist and becoming more of a 'butterfly', this is the inspiration for this
piece I have titled, "Becoming Butterflies."


Supplies: .Gypsy Souls Laser Cuts-Arch Top Triptych 8 Inch , Gypsy Souls Laser Cuts-Cathedral Frame (2), Gypsy Souls Laser Cuts-Butterfly of Gears, Gypsy Souls Laser Cuts-Bird in Ivy, Gypsy Souls Laser Cuts-Fern Fronds, Versa Mark, Judi Kins Black Opal Embossing Powder, Heating Tool,
Stampedous Pearl Luster Lapis Embossing Powder, Decorative Paper- I used
K&C Company-Tim Coffey Foliage Designs, Graphic 45-Nature Sketchbook,
Webster Pages-Garden Gala, Tim Holtz Distress Stains-Salty Ocean, Wild Honey,
Mermaid Lagoon, and Old Paper, Tim Holtz
Distress Sprays-Crushed Olive, Peeled Paint, and Walnut Stain, Metallic Paints
in Greens and Blues, Tattered Angels Glimmer Mist Blue, Permanent Black Ink,
Decorative Stamp, Clamps, Copper Nails, Hammer, Assortment of Tiny Screws, Screwdriver, Awl, Tim Holtz Hinges, Weldbond
1. Take the
Gypsy Souls Laser Cuts Reliquary Arch Top apart.
2. Take apart
the Gypsy Souls Laser Cuts Cathedral Frames I am only using the back portions
as I used the front portions on another project.

3. Versa Mark
the GSLC Reliquary Arch front and back edges with Stampendous Pearl Luster
Lapis Embossing Powder and cure with heating tool.

4. Versa Mark
the GSLC Cathedral Frames with Judi Kins Black Opal Embossing Powders and cure
with heating tool.

5. Fill in
negative spaces with Tim Holtz Distress Stains I used Old Paper and Salty Sea.

6. Secure
decorative paper of your choosing to front and back of each frame leaving a
border all around.


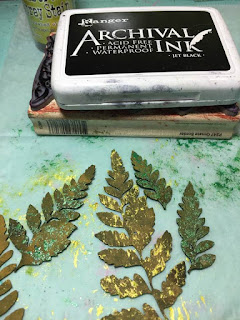
7. Use Tim
Holtz Distress Sprays and Metallic Paints to color GSLC Fern Fronds add details with metallic paints.


8. Use Tim
Holtz Distress Spays and Stains to color GSLC Bird in Ivy using a tiny paint
brush.


9. Add details
with metallic paints.
10.
When GSLC Fern Fronds and GSLC Bird in Ivy are
completely dry use permanent black ink and a decorative stamp of your choosing
to add details.


11.
Cut GSLC Butterfly with Gears in half, stain with
Tim Holtz Wild Honey Distress Stains, add details with blue metallic paints,
then spray with blue Glimmer Mist.

12.
When GSLC Butterfly with Gears is completely dry use
permanent black ink and a decorative stamp of your choosing to add details.

13.
Glue front portion Reliquary Arch Top to back
portion secure with clamps to assure proper attachment.


14.
While that is drying use Weldbond to secure GSLC Butterfly with Gears Wings to both GSLC Cathedral
Frames.

15.
Add copper nails using a hammer for decorative addition.

16.
Assemble GSLC Reliquary Arch Top with GSLC Fern
Fronds and GSLC Bird in Ivy.

17.
Add a few GSLC Fern Fronds to back portions of GSLC
Reliquary Arch and GSCL Cathedral Frames.
18.
Finish by using Tim Holtz Hinges to make a Triptych
with the GSLC Reliquary Arch Top in the middle and GSCL Cathedral Frames are on
either side, left and right.

19.
You must be
very careful to assure that hinges can arch out and that all three sections are
level so it will stand up properly.
This makes a great stand alone piece or
inspirational gift. I will leave you
with another quote by Thomas Merton, "Art enables us to find ourselves and
lose ourselves at the same time." I love how quickly the hours pass when I
am creating in my studio and to have the end results be pleasing not only to my
eyes but to others that encounter it.


I cannot wait to see your interpretation of this project. Share it on the Gypsy Soul Laser Cuts Craft Group Page on Facebook. I would love to see what new creations you are working on!


