Welcome
to my maiden voyage as a guest designer for Gypsy Soul Laser Cuts. My name is
Jon David Lowe and I am mixed media artist whose canvas of choice are
hand-bound art journals I call "treasure book" or Houdini-Hideaway
boxes that contain a hidden book as a surprise. From a poem by J.R.R Tolkien,
"All that is gold does not glitter, Not all those who wander are
lost..."I hope that I can offer a different perspective to this already
amazing team of artist. I am new to the journey of blogging and tutorials but
love how my art soothes my soul and gives me courage to live without fear. By
day I am a Middle School Math/Science so my blog style will reflect that in the
minutia of details and steps included.
Supplies: .Gypsy Souls
Laser Cuts-Arch Top Triptych 8 Inch , Gypsy Souls
Laser Cuts-Steampunk Shape Set, Gypsy Souls
Laser Cuts-Steampunk Gentleman, Gypsy Souls
Laser Cuts-Narrow Windows, Gypsy Souls
Laser Cuts- Leafy Swirl, decorative paper-I used Ella
& Liv Steampunk Style, sand sponge, distress stains of your choosing-I used
Tim Holtz tea dye. vintage photo, weathered wood, distress sprays-I used Tim
Holtz Peeled Paint and Aged Mahogany, versa mark, iced enamel medium, embossing
enamel or powder-I used Stampendous-Aged Hunter, Ice Enamels-German Silver,
Tarnished Bronze, and Torched Copper, Embossing Antiquities-Rust, heat tool,
Weldbond glue, clamps, small stiff bristle brush, Wendy Vecchi Embossing paste
and Crackle Paste, thin plastic palate knife, alcohol ink, I used pebble,
sandal, and rust, blending tool, screwdriver, assortment of tiny screws,
two decorative wooden dowels and wooden
knops to fit on end, Ziploc baggie of kitty litter, heavy gel medium, assortment of metal and plastic
embellishments, microbeads, Ranger Glossy Accents
1.
Take the Gypsy
Souls Laser Cuts Reliquary Arch Top apart.
2.
Use back panel to
trace a stencil on a piece of decorative paper you will use for back panel. I
made two stencils as I wanted to cover both parts of back panel.
3. Cut out decorative paper panel and adhere to both
sides of back panel using Weldbond.
4. Allow
to dry fully.
5. Use
a sandpaper sponge to lightly distress the edges and take away some of the
gloss of the paper.
6. Apply
Tim Holtz Distress Stains Tea Dye and
Weathered Wood.
7.
On top portion of
Gypsy Souls Laser Cuts Reliquary Arch add Versa Mark.
8.
Sprinkle with
embossing enamel or powder. I used Stampendous Aged Hunter and cure with your
heating tool.
9.
I added more age by
apply some Susan Lenhart Kazmer Iced Enamels Torched Coppers in random areas and cured with a heating
tool.
10.
Glue the two pieces
of the Gypsy Souls Laser Cuts Reliquary Arch together using Weldbond glue and
clamps. I used a small stiff bristle brush to remove any Weldbond that squeezed
through the frames.
11.
Gather gears from
Gypsy Souls Laser Cuts Steampunk Shape Set.
12.
Use Ice Resin
Enamels of German Silver and Tarnished Bronze and Iced Enamel Medium and Embossing
Antiquities Rust with Versa Mark to give them a metallic look curing with heating tool.
13.
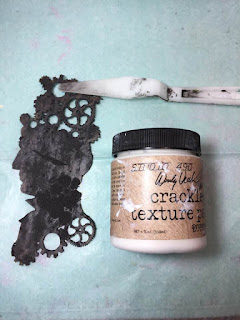
Apply a thin layer
of Wendy Vecchi Embossing paste to both sides of Gypsy Souls Laser Cuts
Steampunk Gentleman.
14.
Allow to dry fully.
15.
Add a thin layer of
Wendy Vecchi Crackle Paste to both side of Gypsy Souls Laser Cuts Steampunk
Gentleman.
16.
Allow to air dry
overnight preferably for best results.
17.
Use Tim Holtz
Distress Stain of Vintage Photo to dye Gypsy Souls Laser Cuts Narrow window.
18.
Use Versa Mark and
Stampendous Aged Hunter and Iced Enamel medium and Torched Copper to age Gypsy
Souls Laser Cuts Leafy Swirl.
19.
Use Weldbond to
glue Narrow Window background.
20.
Use Tim Holtz
Distress Stain of Vintage Photo and Tim Holtz Distress Spray Stains of Peeled
Paint and Aged Mahogany to color wooden dowels and end knobs.
21.
Glue ends to wooden
dowels using Weldbond.
22.
Make note of where
they will be attached to base of project.
23.
Use alcohol inks of
pebble, sandal, and rust on a blending tool highlight crackle on dried
Steampunk Gentleman.
24.
Use screwdriver and
assortment of small screws to attach Steampunk Gentleman and Metallic Gears to project.
25.
Add areas of interest
in random places of your project by building layers securing embellishments
with heavy gel medium and a small stiff bristle brush.
26.
Before everything
dries sprinkle with microbeads, I used copper and black.
27.
Add Ranger Glossy
Accents to Narrow Window panes.
28.
Allow to dry for 24
hours so Glossy Accents and Heavy Gel Medium will cure clear.
29. Add finishing touches using acrylic paints and alcohol inks.
29. Add finishing touches using acrylic paints and alcohol inks.
30.
Attach wooden dowel
using screws and a bit of Weldbond.
I cannot wait to see your interpretation of this project. Share it on the Gypsy Soul Laser Cuts Craft Group Page on Facebook. I would love to see what new creations you are working on!
This
makes a great stand alone piece or 3-D Father's Day gift. These are some of the techniques that I would
use to make smaller panels for my treasure books or on my Houdini-Hideaway
boxes. Hope this will encourage you on in you artistic adventure and journey.
"Little by little, one travels far." J. R. R. Tolkien
I cannot wait to see your interpretation of this project. Share it on the Gypsy Soul Laser Cuts Craft Group Page on Facebook. I would love to see what new creations you are working on!


No comments:
Post a Comment