Wednesday, September 23, 2020

Magical Misfits-A Peek-a-Boo Project


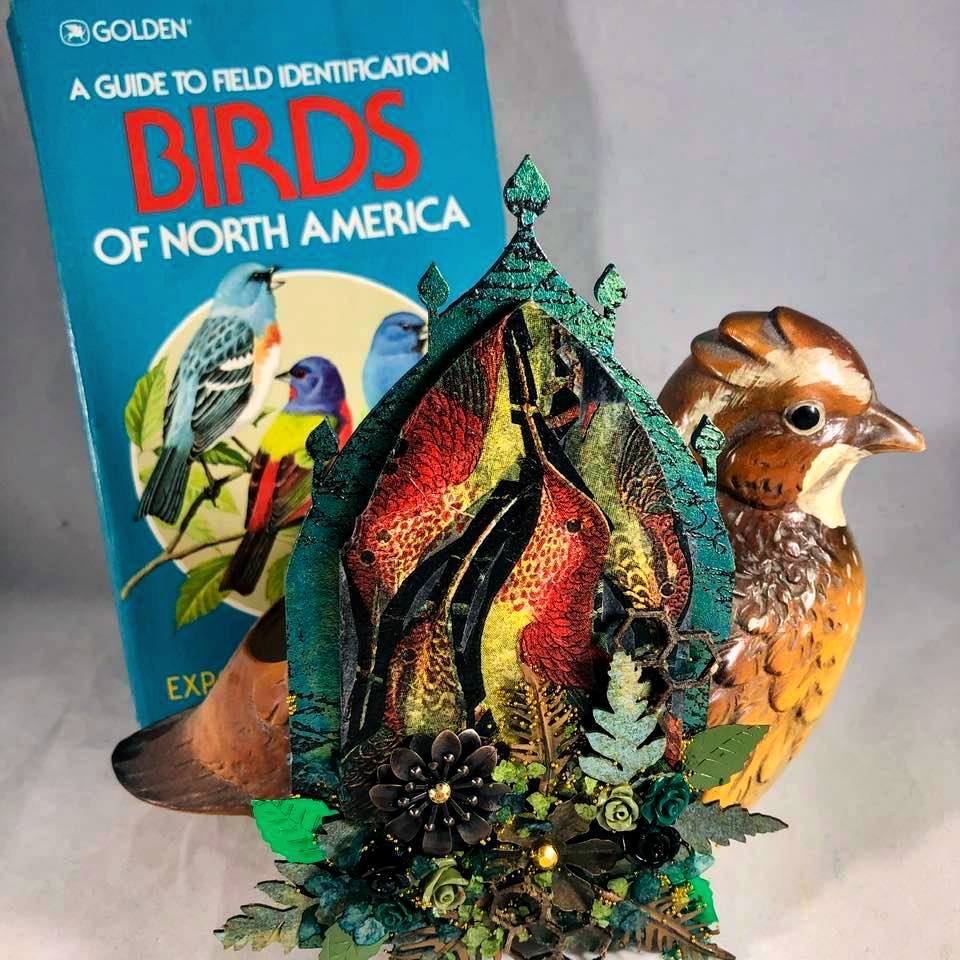
This project grew out of a pile of mismatched and discarded items. I had leftover hummingbirds from a decorative napkin, a back portion of a triptych tower top, an arch top house silhouette piece, some fern fronds, and honeycomb, all parts from previous installments. I’ve long been fascinated by hummingbirds and Vintage Audubon Prints. These are the inspiration for this installment.
 Supplies:  Gypsy Soul Laser Cuts-Arch Top House Silhouettes, Gypsy Soul Laser Cuts-Triptych Tower Top, Gypsy Soul Laser Cuts-Fern Fronds, Gypsy Soul Laser Cuts-Honeycomb & Queen Bees ATC Sized, Black Ink, Paintbrush, White Gesso, Decorative Napkins, Halo Blue Gold Acrylic Paint, Nail Polish, Embossing Ink Roller Applicator, Script Stamp, Allure Mercury Rising Embossing Powder, Heating Tool, Weldbond, Metal Clamps, Ultra Thick Gel Medium, Embellishments, Mica Flakes, Micro Beads
1.    Look through you treasure tough of misfit art supplies and be inspired. I found part of a Gypsy Soul Laser Cuts-Arch Top House Silhouettes,  and part of a Gypsy Soul Laser Cuts-Triptych Tower Top to use for this project.
2.    I painted the GSLC Arch Top House Silhouette with black in and a paintbrush.
3.    I had leftover hummingbirds from a decorative napkin.
4.    After taking off the two plies I realized they were too thin, and I would not see their gorgeous details, so I painted the back of them with white gesso.
5.    Once dry I arranged them onto the prepared GSLC Arch Top House Silhouette using matte medium.
6.    I layered several of the hummingbirds to assure clarity of design.
7.    I next painted the Gypsy Soul Laser Cuts-Triptych Tower Top with halo blue gold acrylic paint.
8.    I used two different shades of fingernail polish to add details and interest to frame.
9.    Using Embossing ink with a roller applicator I added some script to the frame. Using Allure Mercury Rising Embossing powder and a heating tool.
 
10.                   Glue the prepared hummingbird piece to the green frame. Offsetting leaving space at the bottom to create a small assemblage.
11.                   Hold pieces together with metal clamps until fully adhered.
12.                   Go through your stash of embellishments and choose some interesting pieces to add to the bottom portion. I am using fern fronds, honeycomb, leaves and flowers to build up the bottom portion of your project using Ultra Thick Gel Medium.
13.                   While still wet sprinkle with mica flakes and microbeads.
14.                   Allow to dry fully.

 Some Final Thoughts.
I love happy mistakes, magical misfits or what Bob Ross called “happy little accidents”. This project surprised me and allowed me to be fully creative as I had no idea what the final project would look like.
Other Bob Ross Quotes.
“I guess I am a little weird. I like to talk to trees and animals. That’s okay though; I have more fun than most people.”
“I can’t think of anything more rewarding than being able to express yourself to others through painting (art). Exercising the imagination, experimenting with our talents, being creative; these things, to me, are truly the windows to your soul.”
“Let’s get crazy.”
“this is your world, you’re the creator. Find freedom on this canvas. Believe, that you can do it, ‘cuz you can do it, YOU CAN DO IT!”


Wednesday, September 9, 2020

School Daze Deux-A Peek-a-Boo-Project

It’s usually the saddest month of the year for teachers in Maryland as this is the month we say good-bye to our summer selves. This year is very different than most as I have been teaching virtually since March 13, 2020 and will begin the Fall Semester doing the same thing. This begins my 32nd year and I have seen things I never thought I would see or need to process as a teacher, it's very different from the one room school houses where my grandmother trained new teacher. Here's to wishing all educators, students, and their support systems the best year it can be under this new normal. I enjoy summer as it I my most creative and productive time. Last year I made a power point of some of my childhood school pictures and others I collected online. They are the inspiration for this instillation.
Supplies:  Gypsy Soul Laser Cuts-Mini House Album, Pencil, Card stock, Scissors, Electrical Tape, School Theme Scrapbook Paper, Bone Folder, Spray Paint-I Used Krylon Stone Coarse Texture-Obsidian, Matte Medium, Paintbrush, Iron Paste, Cursive Stencil, Plastic Spatula, Script Stamps, Poppy Ink Pad, Leaf Green Ink Pad, Quinacridone Nickel Azo Acrylic Paint, Decorative Napkins
1.  The Gypsy Soul Laser Cuts-Mini House Album comes with 6 sections, I have never used them before so this was a learning opportunity for me. I like how the shape reminded me of one room schoolhouses I see often when I grew up in Pennsylvania.
2.  I made a template of the shape as I wasted to connect the houses together accordion style.
3.  I cut the template a bit smaller as I wanted the papers to be framed with a border.

4.   I used electrical tape to put the pieces together.
5.  I made sure each section would fold pressing the electrical tape with a bone folder.
6.  I wanted the border to look like a chalkboard but did not have that type of paint, so I improvised and used Krylon Stone Coarse Texture Spray-paint-Obsidian.  Do this in a well-ventilated area.
7.   While allowing to dry fully trace and cut out panels you will use on each of the conjoined pieces. I also cut out additional pieces I would use in layering the individual “frames”
8.  Before gluing chosen images to panels I coated entire piece with matte medium.
9.   Use Weldbond to attach papers.
10.                I wanted to add more layers and I used a cursive stencil applying iron paste with a plastic spatula.


11.                To further this theme, I added other script using stamps and poppy and leaf green inks.
 

12.                To unify the piece, I made a wash of Quinacridone Nickle Azo Acrylic Paint and Matte Medium and a paintbrush.

13.                I felt there needed to be more drama and layers and found some decorative napkins I could use to do just that.

14.                Make sure you take apart the napkins so that you have just the one ply remaining.
15.                Add these napkin pieces using matte medium and a paintbrush.   
Some Final Thoughts.
It’s hard to settle into a new school year. This year I begin my 32nd year of teaching. People ask me when I will retire, and I wish I could some days but also know that teaching keeps me young at heart and I have been reminded of my lasting impressions on former students. These are two I keep nearby that carry me through dark days of summer’s end.
“I had you for my 6th grade home room. I’m 22 now and I just wanted to let you know I’m a shift supervisor at a Starbucks. In my training I tell everyone, “Don’t be sorry, be different.” I remember you used to say that to us every time we got talking or goofing off. Never really understood what you were saying then, but as of today I take those words and use them 9/10 times while coaching my baristas. They always ask me where I heard the saying and I always tell them my experience while you were my teacher. Thank you for all that you do Mr. Lowe, your teaching never goes unnoticed…even years later!” 

“I am graduating this year and middle school just feels so far away, but I remember your class like yesterday. I just wanted you to know I always remembered you and that you are an amazing teacher and person, you were my favorite teacher! The most important thing you taught me besides science, is how to be myself, always so accepting, that was something that nobody helped me do before you and I wanted to thank you for all of your hard work and compassion, never ever change”

Reading these among others gives me the courage to go back into the strange land called “Middle School”. It’s never to late to thank a teacher.