Showing posts with label Mixed-Media. Show all posts

Wednesday, May 8, 2024

May Day Remembrance-A Peek-a-Boo Project


Long ago and so many years ago I was invited to a friend of a friend’s house for a May Day Celebration. They lived in a cottage by a spring fed river. She was a Wordsmith-a poet, he a Silversmith-a jeweler. Their home was a land of enchantment. Libations and morsels abound. There were Charcuterie boards before we even knew what they were. A maypole was erected with delicate ribbons dangling in the spring breezes. These are the inspirations for this artwork.

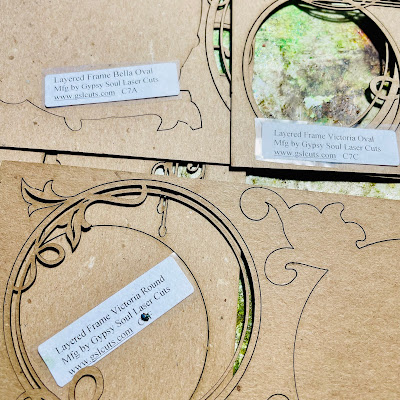
Supplies: GSLC Layered Frame Victoria RoundGSLC Layered Frame Victoria OvalGSLC Layered Frame Bella RoundGSLC Layered Frame Bella Oval, Pencil, Magazine Pictures, Scissors, UHU GlueStick, Nail-file, Green and Bronze Acrylic Paints, Paintbrush, Antiquarian Sticker Books, WeldBond Glue, Blue Glitter, Turquoise Stencil Butter, Quinacridone Nickel Azo Gold Acrylic Paint, Dura Clear Matte Gel Medium

  1. Gather Supplies

  2. Use a Pencil to the trace Bottom Portions of GSLC Layered Frames Onto a Magazine Picture of Your Choosing.
  3. Cut Out With Scissors and Glue to Bottom Portions for GSLC Frames Using a UHU GlueStick.
  4. Use a Nail-File to Smooth off any Rough Edges.
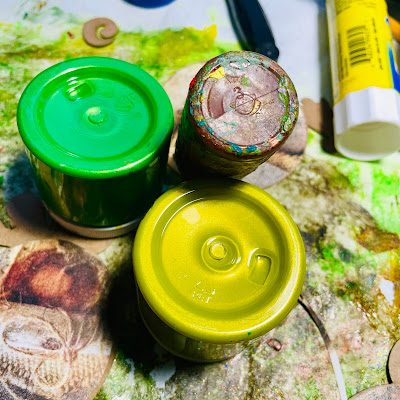
  5. Use Green and Bronze Metallic Paints to Soften the Edges and Unify Pieces.
  6. Go Through Antiquarian Sticker Books, Selecting Items You Wish to Collage on these Frame Back Portions. 
  7. I Use WeldBond to Add Blue Glitter to Top Portions of GSLC Layered Frames. I would Caution Against This as It was Extremely Difficult to Separate the Delicate Frames from the Substrate.
  8. Once Delicate Frames are Separated from Substrate I Added Turquoise Stencil Butter as Most of the Blue Glitter was Removed by This Time.
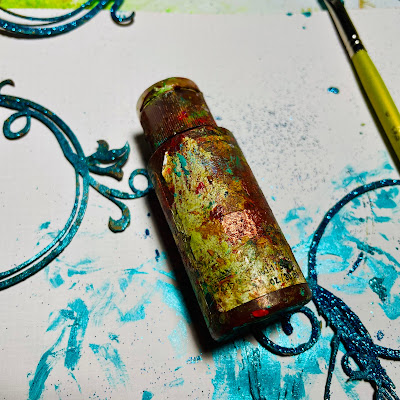
  9. To Add an Aged Patina I Used a Dry Brush Technique to add Quinacridone Nickel Azo Gold Acrylic Paint to These Upper Portions of the GSLC Layered Frames.
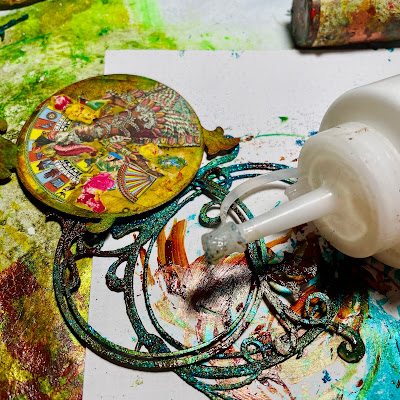
  10. Use WeldBond to Attach the Delicate Tope Portions of the Frames to their Prepared Bottom Collages.
  11. Dry Fully, Flatted and Weighted Down.
  12. To Unify the Art Pieces Coat with Dura Clear Matte Gel Medium.


Final Thoughts

May Day is a European festival of ancient origins marking the beginning of summer, usually celebrated on May 1st. Traditions often include gathering wildflowers and green branches, weaving floral garlands, and setting up a Maypole, around which people dance. It is also often celebrated with bonfires and a good bit of drinking.


There are days I wish I could live again. May Day at the Bastian’s is one of them.


"The world's favorite season is the spring. 
All things seem possible in May."
- Edwin Way Teale


Wednesday, August 9, 2023

In the Eye of the Beholder-A Peek-a-Boo Project


 It is an old axiom, and well said, That “beauty is in the eye of the beholder”.  Small paintings of eyes first became popular during the late eighteenth century. They reminded wearers of a loved one, whose identity remained a secret. The single eye also symbolized the watchful gaze of a jealous partner, who feared that his or her lover might stray. These are the inspirations for this artwork.


Supplies:  GSLC Connie's Mini Frames , Magazine adverts, Pencil, Scissors, Metallic Paints, Scraps of Thin Cardboard, UHU GlueStick, Ranger Glossy Accent, Micro Gems

  1. Gather Supplies.
  2. Go Through Magazines Adverts Looking for Expressive Eyes.
  3. Use a Pencil to Trace Smaller Portion of GSLC Mini Frames.
  4. Cut Out Traced Eyes Using Scissors.
  5. Now Look Through Magazine for Texture Images.
  6. Use a Pencil to Trace Larger Portion of GSLC Mini Frames.
  7. Cut Out Traced Textures Using Scissors.
  8. Paint Inner Smaller GSLC Mini frames with Metallic Paints-I Used Copper and Golden Tones.
  9. Paint Outer Larger GSLC Mini Frames with Metallic Paints-I Used Blue  and Toned it Down with Golden Transparent Iron Oxide Paint.
  10. Use a Pencil to Trace Larger Portion of GSLC Mini Frames on to Scraps of Thin Cardboard.
  11. Cut Out Traced Templates Using Scissors.
  12.  Glue Larger Portion of GSLC Mini Frames on to Scraps of Thin CardboardUsing a UHU GlueStick.
  13. Glue Eyes to Back side of Inner Smaller GSLC Mini Frames.
  14. Glue Inner Smaller GSLC Mini Frames Onto Inside Center Of Larger Outer GSLC Mini Frames.
  15. Press and Dry Completely.
  16. Add Micro Gems to Frames Randomly Securing with Ranger Gloss Accent.


Final Thoughts:

As a child when we would take the road trip to visit our cousins in New Jersey  we’d play a version of the “I spy with my little eye” game. Mostly it would turn into the alphabet  game where we would teach for letters on signs or license plates.  The end of this game proved to be more challenging than the first part.


Eye Quotes

The real voyage of discovery consists not in seeking new landscapes, but in having new eyes.

~Marcel Proust

Behind every great man is a woman rolling her eyes.

~Jim Carrey

He who can no longer pause to wonder and stand rapt in awe, is as good as dead; his eyes are closed.

~Albert Einstein

You can't depend on your eyes when your imagination is out of focus.

~Mark Twain

Let my soul smile through my heart and my heart smile through my eyes, that I may scatter rich smiles in sad hearts.

~Paramahansa Yogananda

Keep your eyes wide open before marriage, half shut afterwards.

~Benjamin Franklin

What the eyes see and the ears hear, the mind believes.

~Harry Houdini


Wednesday, October 14, 2020

Altered Relations-A Peek-a-Boo-Project

I’m one of many who love finding old pictures at antique stores, online, or if we are lucky maybe our family’s attic. These often have no known name and become adopted as our “Found Relatives”. These are the inspirations for this instillation with a Halloween Twist.


Supplies:  Gypsy Soul Laser Cuts-Lace Frame, Photocopies of “Found Relatives”. Transparency of Halloween Masks, Pencil, Red Cardstock, Scissors, Embossing Ink with a Roller Applicator, Allure Oil Rubbed Bronze and Hammered Metal Embossing Powder, Heating Tool, Acrylic Paint-Copper, Black, Quinacridone Nickle Azo Gold, Paintbrush, Weldbond, Glossy Accent, Sharpie
1.  Start by making Photocopies of “Found Relatives” and Transparency of Halloween Masks.
 
 
2.  Alter Gypsy Soul Laser Cuts-Lace Frames using Embossing Ink with a Roller Applicator and Allure Oil Rubbed Bronze and Hammered Metal Embossing Powders, Curing with a Heating Tool.
 
3.  Once Cooled Added Patina Using Acrylic Paint-Copper, Black, Quinacridone Nickle Azo Gold and a Paintbrush.
 
4.   Place Halloween Masks Over “Found Relatives” transforming them into “Altered Relations”. For this first go around, I taped them to photocopies and printed again.
 
5.  I traced around inner circle of GSLC Lace Frames and glued “Altered Relations” to back before gluing down to red cardstock using Weldbond.
 
6.  I dried them flat and was very surprised and disappointed when I looked at them the next day. The glue had bled the photocopies and they were no longer useful.

7.  So, the mother of invention, out of necessity, I had to come up with a second plan.
8.  With new photocopies of “Found Relatives” and new transparency masks, I used Glossy Accents to attach the masks.
9.  Once dry I used a sharpie to trace the new “Altered Relations” and glued them to the center of the GSLC Lace Frames.
10.                Once they were dried flat, I added a layer of Glossy Accent to make it appear as if the GSLC Lace Frames has a Glass Insert.
11.                Final step was to fussy cut GSLC Lace Frames from the Red Card stock.

Some Final Thoughts.