Showing posts with label Polymer Clay. Show all posts

Wednesday, November 13, 2019

Dainty Dragons- A Peek-a-Boo Project

I’ve always enjoyed miniature enchantments, so when I received these Gypsy Soul Laser Small Dome Charms. I knew that I would use them to make some dainty dragon polymer clay pieces.
Supplies:  Gypsy Soul Laser Cuts-Wooden Charm-Dome Small [D107D],Gypsy Soul Laser Cuts-Bat Wings Miniatures [RB28], Gypsy Soul Laser Cuts-Minatare Crowns-Coming Soon, Weldbond, Sculpey SoufflĂ© Polymer Clay, Texture Stamp, Mica Powders, Small Acrylic Eyes, Sculpey Bakeable Clay, Polymer Clay Cutters, Paintbrush, Rub’n Buff, Polymer Clay Oven, Acrylic Paint for Adding Details
1.  Cut apart GSLC Bat Wings Miniatures.
2.  Glue GSLC Wooden Charm Small Domes together using Weldbond.
3.   Turn on polymer clay oven to recommended settings as described on package.
4.  Roll out small piece of clay onto texture stamp.
 
5.  Use mica powders to add a sheen to the prepared clay.
6.  Use cutters to make a clay circle slightly bigger than acrylic eye.
7.  Put a thin layer of Sculpey Bakeable Clay on base of GSLC Charm Dome.
8.  Add a thin layer of prepared clay to the back of the GSLC Charm.
9.  Sculpt around acrylic eye until you are satisfied with dragon eye. 
10.                Add Sculpey Bakeable Clay to GSLC Minatare Bat Wings so that you can add prepared clay to wings.
11.                Add details to GSLC Minatare Bat Wings using additional clay pieces.
12.                Adhere GSLC Minatare Bat Wings to back of GSLC Small Dome Charm.
13.                Use Rub’n Buff Gold Leaf to GSLC Miniature Crowns.
14.                Using a bit of Sculpey Bakebable Clay to base of GSLC Miniature Crowns and pace upon dainty dragon eye.
15.                Bake at manufactures recommended temperature and time to cure the dainty dragon eye.
16.                Once cooled use acrylic paints to add detailing to dainty dragon eyes.
17.                Your dainty dragons are ready to wear as jewelry or in your mixed art assemblages.
   
 
Some final thoughts 
As we walk through our days we should keep our eyes open for the unexpected enchantments, the small miracles that are there if we are willing to look, the changing of seasons, the health we have, our trusted friends, the love of our family, the dawning of a day, the sent of a favorite fragrance, the sight of a rainbow…and on and on goes the lists. May you be given eyes to see your many blessings.

Wednesday, March 14, 2018

Peek-A-Boo Project-Queen of HeARTs

Today I said goodbye to my sweet orange Tabby named Ruby. She like the Queen of Hearts in Alice in Wonderland were both gingers and knew what they wanted. Ruby was short for Rhubarb because she was so sassy. This is my way of honoring her in a in a ruby inspired piece.
Supplies:  Reliquary - Arch Top from Gypsy Souls Laser Cuts, decorative paper, sand sponge, distress stains of your choosing,  permanent ink of your choosing, stamp to add details, ink blending tool, iced enamel medium, embossing enamel or powder, heat tool, Weldbond glue, clamps, small stiff bristle brush, focal point I used a polymer clay piece I created using molds and metal angel wings and mica powders,  Ziploc baggie of kitty litter, heavy gel medium,  assortment of metal and plastic embellishments, microbeads
1.  Take the Gypsy Souls Laser Cuts Reliquary Arch Top apart.

2.  Use back panel to trace a stencil on a piece of decorative paper you will use for back panel.
3.  Cut out decorative paper panel and adhere to back panel using Weldbond.
4.  Allow to dry fully.
5.  Use a sandpaper sponge to lightly distress the edges.
6. Apply Tim Holtz  Distress Stain Ripe Persimmon to the edges.
7.  Next use a stamp of your choosing to apply so interesting layers to your background. I used Wendy Vecchi Cactus Flower Archival Ink.
8.  Use a blending tool to add depth and interest to your background and to darken the edges.

9.  On top portion of Gypsy Souls Laser Cuts Reliquary Arch I added Iced Enamel Medium.
10.                Sprinkle with embossing enamel or powder. I used Susan Lenhart Kazmer Iced Enamels Garnet
11.                Cure with your heating tool.
12.                I added more age by apply some Susan Lenhart Kazmer Iced Enamels Torched Coppers in random areas.

13.                Cure with a heating tool.


14.   Glue the two pieces of the Gypsy Souls Laser Cuts Reliquary Arch together using Weldbond glue and clamps. I used a small stiff bristle brush to remove any Weldbond that squeezed through the frames.
15.                Gather central focal point. I used a polymer clay piece I made using molds and following instructions on package.


16.                Glue focal point using Weldbond I left room at the bottom to add smaller details.
17.                I use a bag of kitty litter to press securely on to background and allow to dry overnight.
18.                Assemble your project by building layers securing embellishments with heavy gel medium and a small stiff bristle brush.
 
19.                Before everything dries sprinkle with microbeads, I used copper and black.
20.                Allow to dry for 24 hours so heavy gel medium will cure clear.
 
This makes a great stand alone piece or 3-D Mother's Day gift.  I will be using it as panel for one of my Classic Combo Limited Edition Alice in Wonderland Treasure Books.


Friday, March 2, 2018

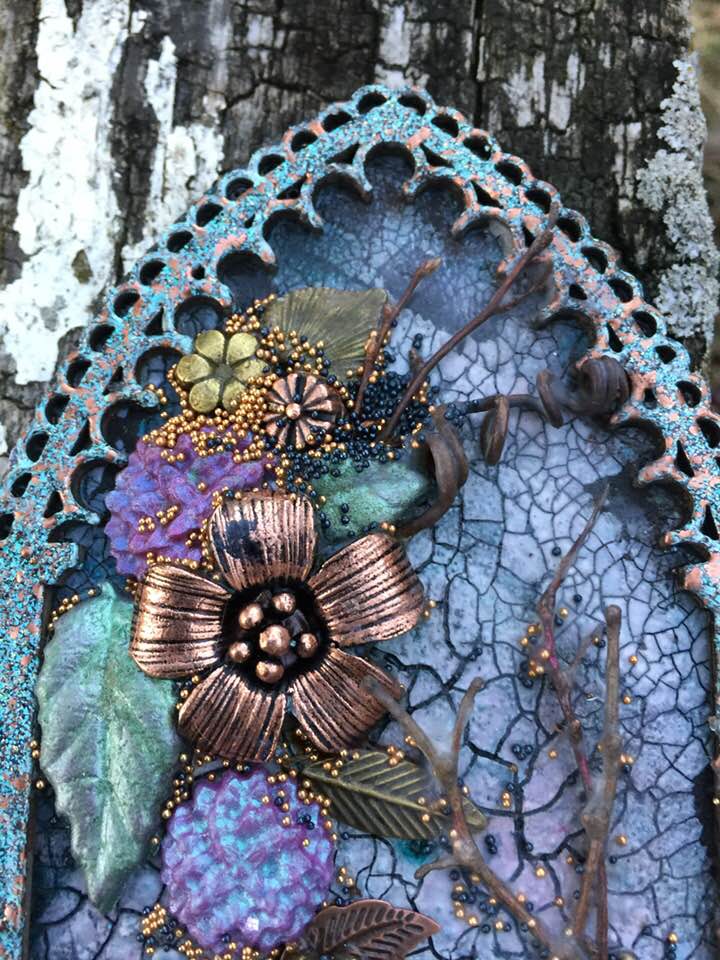
Peek-a-Boo Project-Branch Bouquets

Growing up in Pennsylvania, where February can be the longest month of winter, my mom used to make branch bouquets from cutting branches in our yard. We'd trick the forsythia, crab apple, dogwood, and sometimes lilac into blooming to remind us that Spring was on its way. This Peek-a-Boo project is a  tribute to those fond memories. 

Supplies:  Reliquary - Arch Top from Gypsy Souls Laser Cuts, black embossing paste and crackle paste, plastic palette knife, alcohol inks, ink blending tool, versa mark, embossing enamel or powder, heat tool, Weldbond glue, clamps, small stiff bristle brush, floral embellishments, leaf embellishments, tiny twigs, heavy gel medium, microbeads, flat back rhinestones, and matte gel varnish

1.  Take the Gypsy Souls Laser Cuts Reliquary Arch Top apart
2.  On the back panel apply a thin layer of black embossing paste I use a thin plastic palette knife and prefer Wendy Vecchi products.
3.  Allow to dry fully.
4.  Now apply a thin layer of crackle paste. I use a thin plastic palette knife and prefer Wendy Vecchi products. The thinner the layer the smaller the crackle effect, the thicker the layer the deeper more pronounced crackle effect.
5. Allow to dry overnight for best results.


6.  While crackle paste is drying place versa mark on top portion of Gypsy Souls Laser Cuts Reliquary Arch.
7.  Sprinkle with embossing enamel or powder. I used Stampendous Frantage Aged Hunter Embossing Enamel.
8.  Cure with your heating tool.
9.  Next day once the crackle paste is dry I add desired alcohol inks to ink blending tool and add this to the dried crackle paste. To lighten sections spray with rubbing alcohol and dry with heat gun. I used tones of grey, tan, and blue.(Ranger pebble, mushroom, sailboat blue to be specific)

10.                Glue the two pieces of the Gypsy Souls Laser Cuts Reliquary Arch together using Weldbond glue and clamps. I used a small stiff bristle brush to remove any Weldbond that squeezed through the frames.
11.                Gather your floral and leaf embellishments. I used polymer clay ones using molds and instructions on product and metal embellishments collected from various art suppliers.


12.                Gather a few interesting twigs from your yard or from a walk in the park.
13.                Assemble your project by building layers securing embellishments with heavy gel medium and a small stiff bristle brush.
14.                I started with the polymer clay embellishments.
15.                Next I added the metal embellishments.
16.                For final step of assemblage I carefully added tiny pieces of twigs.
17.                Before everything dries sprinkle with microbeads, I used copper and black. Carefully remove excess beads by tapping gently.
18.                Two flat back gemstones were added using heavy gel medium and a small stiff bristle brush.
19.                Allow to dry for 24 hours so heavy gel medium will cure clear.
20.                Lastly I stabilized the twigs using a brush and a matt gel varnish.


This makes a great stand alone piece or 3-D Mother's Day gift.  I will be using it as panel for one of my Treasure Books or on a Houdini-Hideaway Box.

I have made a companion piece for this project. I like how they compliment each other.