Wednesday, September 26, 2018

Caged Fairies-Peek-A-Boo Project

I continue my September lament, some days 'adulting' is a real drag, especially as a middle school teacher when you had off for summer vacation. This is the inspiration for this artwork, I've titled "Caged Fairies" as I feel like I cannot be my true self with all the expectations and requirements that are part of many jobs!! Lady Cottington's Pressed Fairy Book was released many years ago when I first saw it I was very amused. It tickeled my sense of humor. Having a good sense of humor makes many "adulting" entrapment less daunting.
Supplies:  Gypsy Soul Laser Cuts-Doodled Cage with Solid Back, Gypsy Soul Laser Cuts-Garden Fairies Small, Gypsy Soul Laser Cuts-Steampunk Shape Set, Gypsy Soul Laser Cuts-Winter Shape Set, Decorative 12x12 Scrapbook Paper Fairy Theme, Pencil, Scissors, Weldbond, Purple Marker, Versa Mark, Heating Tool, Embossing Powder(Gold, Copper, Verde, Black Sparkle, Blues, Perfect Peacock, Red). Black Acrylic Paint, Paintbrush, Clamps, Small Hole Punch, Flat Nose Pliers, Jump Rings, Decorative Chain
1.  Take the Gypsy Soul Laser Cuts Doodled Cage, Birdcages and one wing from GSLC Steampunk Set and Icicles from GSLC Winter Shape Set, and chosen fairy apart.
 

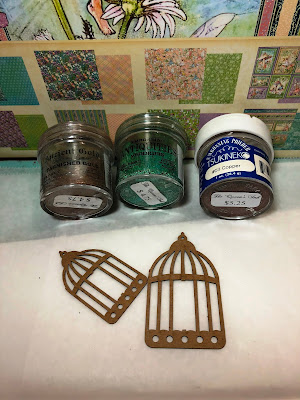
2.  Use Versa Mark to add layers of copper, antique gold, and Verde embossing powders to birdcages.
 

3.  Cure with heating tool.
4.  Once cages have dried, dry bush with black acrylic paint to "antique" them.

5.  Trace Birdcages onto Scrapbook Paper and fussy cut out background shapes.
 

6.  Use Weldbond to glue decorative paper to largest  birdcage to give it a background save other two backgrounds for later.

7.  Trace edges with purple marker.
 

8.  Use Versa mark to color fairy and wings

 using Black, Blue, and Extreme Peacock embossing powders.


9.  Cure with heating tool.
10.                Use Versa Mark to color cut out heart from scrap, and icicles using red embossing powders.
11.                Cure with heating tool, and "antique" using a dry brush and black acrylic paint.

12.                Sandwich Fairy, Heart, and Wing inside of birdcages-trapping them using Weldbond on edges.
 

13.                Secure with clamps and allow to fry fully.

14.                Add Blood Icicles to birdcages, securing with Weldbond, using clamps to assure stability.

15.                Once everything is complexly dry use a small hole punch to punch small holes on top of birdcages and bottom corners of Doodled Cage.

16.                Use flat nose pliers to add smaller birdcages to bottom of larger birdcage using decorative chain.
17.                Your Caged Fairy Mobile is now ready to display!!


 Some final thoughts. There are not many quotes about caged fairies but there are a few for caged birds. Maya Angelou, "The caged bird sings with a fearful trill, of things unknown, but longed for still, and his tune is heard on the distant hill, for the caged bird sings of freedom." Stephen King, "I have to remind myself that some birds are not meant to be caged. Their feathers are just too bright" I've learned many lessons along the way of becoming a grown up, and I believe that we have freedom to choose how we will respond to all that comes our way, and we are not trapped or caged in, there is always the hope of better days.


Wednesday, September 12, 2018

School Daze-Peek-A-Boo Project

Sad to see September come, it's that time of year when all middle school teachers wish they create some kind of magical spell to make summer last  forever as we cry louder than our students who are returning for the new school year. This is the inspiration for this artwork, titled "School Daze"
Supplies:  Gypsy Soul Laser Cuts-Arabian Triptych, Gypsy Soul Laser Cuts-Tiny Apothecary Bottles, Gypsy Soul Laser Cuts-Crackle Foam Pad-Coming Soon, DCWV Vintage Memories 12 by 12 scrapbook paper, Printed Alchemy Images, Scissors, Transparencies Designed for Your Printer, Pencil, Weldbond, Fine Wedge Sanding Sponge, Misters with Water and Rubbing Alcohol, Staz-On Saddle Brown Ink Pad, Crackle Stamp, Tim Holtz Distress Stain-Tea Dye and  Brushed Corduroy, Small Paint Brush, Craft Smart Vintage Gold Acrylic Paint, Golden Quinacridone Nickel Azo Gold, Golden Interference Blue (Fine) Acrylic Paint, Deco Art Phthalo Turquoise Acrylic Paint, Versa Mark Ink Pad, Script Stamp, Wendy Vecchi Red Geranium Embossing Powder, Heating Tool, Clamps, Transparency and Copies of Random Images, Grommet, Black Acrylic Paint, Black Permanent Ink Pad, Tim Holtz Blue Distress Marker
1.  Take the Gypsy Soul Laser Cuts Arabian Triptychs Apart, keep the GSLC Tiny Apothecary Bottles together as we will be decorating in a later step.

2.  Find a piece of 12 by 12 Scrapbook Paper you'd like to use for the back of your triptych. I found mine in DCWV Vintage Memories Pad.

3.  Print Random Alchemy Images you find online-I have an ink jet printer.
4.  Print random images for small inside panels on regular paper and on transparencies-use the one designed for your printer.
5.  Trace Alchemy images using triptych as your pattern, do the same for 12 by 12 scrapbook paper.


6.    Fussy Cut all six pieces and use Weldbond to glue to appropriate side of back portion of GSLC Arabian Triptych.
 

7.  Once dry, gently sand edges with wedge sanding sponge to give it a distressed look.

8.  Spritz ink jet images with water and rubbing alcohol and allow images to fade before hitting with heating tool.

9.  Use a crackle stamp and Staz-On Saddle Brown to add  an ancient look to both sides of triptych.

10.                Distress edges using Tim Holtz Distress Stains of Tea Dye and Brushed Corduroy.

11.                Paint front portion of GSLC Arabian Triptych with Craft Smart Vintage Gold Acrylic Paint.

12.                 Once dry- dry brush quickly and randomly with Golden Quinacridone Nickel Azo Acrylic Paint.

13.                Once dry-dry brush quickly and randomly with Phthalo Turquoise Acrylic Paint.

14.                Layer again as needed.
15.                Use Versa Mark and a script stamp to randomly add "magical instructions" to Alchemy Backgrounds.

16.                 Sprinkle with Wendy Vecchi Red Geranium

Embossing Powders and cure with heating tool.
17.                Glue Frames to back of GSLC Arabian Triptych using Weldbond.

18.                Secure with clamps and allow to dry fully.

19.                Make transparency and printed images sandwiches and secure with grommets, staples, or glue. Allow to dry.

20.                Use GSLC Foam Crackle Stamp to add interest to GSLC Tiny Apothecary Bottles-I used same three colors we used on frame.


21.                Stamp bottles using script stamp and black permanent ink.
22.                To add shadowing to bottles use a small paint brush to paint one edge with Phthalo Turquoise Acrylic Paint.
23.                To add a glistening to the bottles randomly add Golden Interference Blue (Fine) Acrylic Paint to each bottle.

24.                Glue Transparency "Sandwiches"  to bottom center of all three frames.
 25.                Add Apothecary bottles to each side.
26.                To give the frames a finished look paint sides of GSLC Arabian Triptych with Craft Smart Vintage Gold Acrylic Paint.


27.                 Once dry- dry brush quickly and randomly with Golden Quinacridone Nickel Azo Acrylic Paint.
28.                Once dry-dry brush quickly and randomly with Phthalo Turquoise Acrylic Paint.

29.                Layer again as needed.
30.                These could be displayed in a frame with a nice piece of tapestry material, mine will most likely be added as an embellishment to one of my handmade art journals or Houdini-Hideaway Boxes. 


Some final thoughts. As I begin my 30th year of teaching I realize there is no magical elixir or spell that can make summer vacation last forever until I one day retire, then all days will be Saturday. But, so much of life is how we perceive it, I've always been an optimist and tend to see the good in people and the world. Hope has carried me though many a dark days. "People are Capable at Any Time in Their Lives, of Doing What They Dream Of" said Paulo Coelho, the Alchemist and I tend to concur with his sentiment.

Another Quote by him that helps me as an educator is, "No Matter what he does, Every person on earth plays a central role in the history of the world, AND normally he doesn't know it!" I hope that my students know how wonderful they are and how big the world truly is.