Growing up in Pennsylvania, where
February can be the longest month of winter, my mom used to make branch
bouquets from cutting branches in our yard. We'd trick the forsythia, crab apple,
dogwood, and sometimes lilac into blooming to remind us that Spring was on its
way. This Peek-a-Boo project is a
tribute to those fond memories.

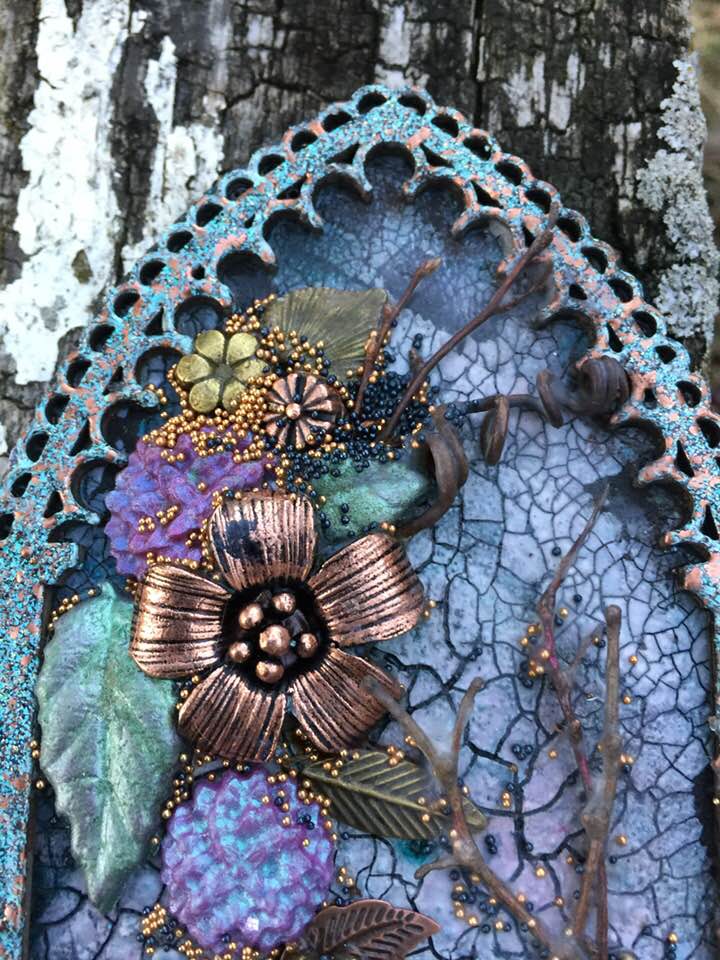
Supplies: Reliquary - Arch Top from Gypsy Souls Laser Cuts, black embossing paste and crackle paste, plastic palette knife, alcohol inks, ink blending tool, versa mark, embossing enamel or powder, heat tool, Weldbond glue, clamps, small stiff bristle brush, floral embellishments, leaf embellishments, tiny twigs, heavy gel medium, microbeads, flat back rhinestones, and matte gel varnish
1. Take the Gypsy
Souls Laser Cuts Reliquary Arch Top apart
2. On the back
panel apply a
thin layer of black embossing paste I use a thin plastic palette knife and
prefer Wendy Vecchi products.

3. Allow to dry fully.
4. Now apply a thin layer of crackle
paste. I use a thin plastic palette knife and prefer Wendy Vecchi products. The
thinner the layer the smaller the crackle effect, the thicker the layer the
deeper more pronounced crackle effect.
5. Allow to dry overnight for best results.

6. While
crackle paste is drying place versa mark on top portion of Gypsy Souls Laser
Cuts Reliquary Arch.

7. Sprinkle
with embossing enamel or powder. I used Stampendous Frantage Aged Hunter
Embossing Enamel.

8. Cure with
your heating tool.

9. Next day once the crackle paste is dry
I add desired alcohol inks to ink blending tool and add this to the dried
crackle paste. To lighten sections spray with rubbing alcohol and dry with heat
gun. I used tones of grey, tan, and blue.(Ranger pebble, mushroom, sailboat
blue to be specific)


10.
Glue the two pieces of the Gypsy Souls Laser Cuts
Reliquary Arch together using Weldbond glue and clamps. I used a small stiff
bristle brush to remove any Weldbond that squeezed through the frames.

11.
Gather your floral and leaf embellishments. I used
polymer clay ones using molds and instructions on product and metal embellishments
collected from various art suppliers.


12.
Gather a few interesting twigs from your yard or
from a walk in the park.

13.
Assemble your project by building layers securing
embellishments with heavy gel medium and a small stiff bristle brush.
14.
I started with the polymer clay embellishments.

15.
Next I added the metal embellishments.

16.
For final step of assemblage I carefully added tiny pieces of twigs.

17.
Before everything dries sprinkle with microbeads, I
used copper and black. Carefully remove excess beads by tapping gently.
18.
Two flat back gemstones were added using heavy gel
medium and a small stiff bristle brush.
19.
Allow to dry for 24 hours so heavy gel medium will
cure clear.
20.
Lastly I stabilized the twigs using a brush and a
matt gel varnish.


This makes a great stand alone piece
or 3-D Mother's Day gift. I will be
using it as panel for one of my Treasure Books or on a Houdini-Hideaway Box.
I have made a companion piece for this project. I like how they compliment each other.
I have made a companion piece for this project. I like how they compliment each other.


No comments:
Post a Comment